MIDI Player / Recorder
Most our audio apps (e.g. iSymphonic Orchestra) are shipped with a built-in MIDI player / recorder, which you can use to playback MIDI songs, as well as for quickly recording musical ideas without the hassle to setup an external DAW app for this purpose. This built-in player / recorder uses the standard MIDI file format. So you may download and open regular MIDI files with this player, as well as exporting your recorded songs, and import them later on into another application, i.e on Mac or PC.

Open the Player / Recorder
 To get to the built-in player/recorder screen of your Crudebyte audio app, tap on the
icon shown on the left. You find this button on the main screen of your app.
The Player/Recorder screen should now appear on your screen, as shown on the
screen shot above.
To get to the built-in player/recorder screen of your Crudebyte audio app, tap on the
icon shown on the left. You find this button on the main screen of your app.
The Player/Recorder screen should now appear on your screen, as shown on the
screen shot above.
Managing Songs
 To manage your songs, tap on the "Files" button, top right on the player/recorder screen.
A new screen appears with
all MIDI (.midi) files currently available with your app to be opened. These
are songs which you either already recorded with this built-in recorder, as
well as MIDI files which you imported on your device
(see how to import MIDI files onto your iPad / iPhone).
To manage your songs, tap on the "Files" button, top right on the player/recorder screen.
A new screen appears with
all MIDI (.midi) files currently available with your app to be opened. These
are songs which you either already recorded with this built-in recorder, as
well as MIDI files which you imported on your device
(see how to import MIDI files onto your iPad / iPhone).

The song names displayed on that list, are their actual file names without their (.mid) file type extension.
Load a Song
To load a song into the player, tap on one of the songs from the song list as shown above.
Delete a Song
 To delete a song, tap on the red "X" button at the right end of the
respective's song strip in the list. This will delete the song's MIDI file
from your iPad / iPhone. After this operation the MIDI song is lost and
cannot be recovered.
To delete a song, tap on the red "X" button at the right end of the
respective's song strip in the list. This will delete the song's MIDI file
from your iPad / iPhone. After this operation the MIDI song is lost and
cannot be recovered.
Main Controls
 On the left you can find the main transport controls of the player / recorder.
Use these buttons to start, stop, pause and continue playback and recording.
Please note that for starting a recording, at least one track of the recorder
must be armed. That means at least one track must be selected for
writing the recorded events to (see track controls below)
On the left you can find the main transport controls of the player / recorder.
Use these buttons to start, stop, pause and continue playback and recording.
Please note that for starting a recording, at least one track of the recorder
must be armed. That means at least one track must be selected for
writing the recorded events to (see track controls below)
Use the metronome button to enable or disable a metronome sound during
active playback and recording (see how to change
the metronome volume below).
On the blue virtual display, you can see the overall status of the recorder.
Top left you can find the name of the current song, which equals its MIDI
file name (without .mid file type extension). Below the song name you find
the current position of the song in bars and beats (starting always at
bar 1 and beat 1). Right next to it you find a symbol reflecting the current
playback or recording status (stopped, paused, playing back, recording),
followed by the song's beat type (e.g. 4/4, 3/4, etc.),
and last but not least the current tempo is shown in beats per minutes.
Song Position
 The lower section of the blue virtual display shows the current song position
in hours, minutes and seconds. Tap on it and slide your finger horizontally
to seek to the desired song position. You may also tap twice on the "Stop" button
to seek to the start of the song.
The lower section of the blue virtual display shows the current song position
in hours, minutes and seconds. Tap on it and slide your finger horizontally
to seek to the desired song position. You may also tap twice on the "Stop" button
to seek to the start of the song.
Time Signature
 The time signature
becomes most notably relevant when the metronome is enabled, it
defines in which pattern and how fast the metronome ticks and helps you to
record your songs and individual tracks in an appropriate synchronized timing.
By default the recorder is set to a time signature of
The time signature
becomes most notably relevant when the metronome is enabled, it
defines in which pattern and how fast the metronome ticks and helps you to
record your songs and individual tracks in an appropriate synchronized timing.
By default the recorder is set to a time signature of 4/4. If you
want to change the time signature, simply tap on the time signature label and
select the desired new one, like shown on this screen shot.
When you save your song, the selected time signature will be stored as part of
your song's MIDI file. That means you may export your
song and load the MIDI file with any standard MIDI file capable software and it
will use the time signature selected and stored with this recorder. Accordingly,
when importing an existing MIDI file into this app, this
recorder will automatically use the time signature set by the original
software that created the MIDI file.
Metronome
 Tapping on the metronome button starts or stops the metronome. Every tap opens a pop up window
allowing to alter the metronome's click volume.
Tapping on the metronome button starts or stops the metronome. Every tap opens a pop up window
allowing to alter the metronome's click volume.
Sometimes an audio click can be disturbing, especially when you are in a studio recording
session. To avoid that, the metronome is visually indicated as you can see on this
animation on the left. So you may completely turn off the audio click while nevertheless record
in beat.
Save Song
 After you recorded a song, you can save it by tapping on the "Save" button.
A dialog pops up on your screen, asking you to enter a song name. Enter a
a new name for your new song, then accept the dialog to save the song as MIDI
(.mid) file.
After you recorded a song, you can save it by tapping on the "Save" button.
A dialog pops up on your screen, asking you to enter a song name. Enter a
a new name for your new song, then accept the dialog to save the song as MIDI
(.mid) file.
You may now load your song back into the player at any time (see how to load a song above).
Tracks
 The largest area of the player / recorder is dedicated to the list of tracks.
Each track is a separate, individual sequence of MIDI data recorded by you.
Usually you are using a separate track for each separate sound you want to play
with your song. For example you might record a track with French Horns, another
track with a Harp sound, yet another track with a small String Ensemble, and
so on. However you might also create tracks for the same sounds, for example
a track with a first draft of your ideas. Then later on you might create a
separate new track and record the idea more precisely and profound, while still
keeping the old draft track (muted) with your song, probably as template for
some other, additional ideas you had there. You can create an arbitrary amount
of tracks with the recorder, and since the tracks' data is stored as abstract
MIDI data, essentially storing (more or less) just the information which keys
you pressed on your keyboard for how long, with which velocity, probably subsequent force
change ("aftertouch"); that means the overall amount of data will always be
small, no matter how long your song will be, and no matter how many tracks
you will keep.
The largest area of the player / recorder is dedicated to the list of tracks.
Each track is a separate, individual sequence of MIDI data recorded by you.
Usually you are using a separate track for each separate sound you want to play
with your song. For example you might record a track with French Horns, another
track with a Harp sound, yet another track with a small String Ensemble, and
so on. However you might also create tracks for the same sounds, for example
a track with a first draft of your ideas. Then later on you might create a
separate new track and record the idea more precisely and profound, while still
keeping the old draft track (muted) with your song, probably as template for
some other, additional ideas you had there. You can create an arbitrary amount
of tracks with the recorder, and since the tracks' data is stored as abstract
MIDI data, essentially storing (more or less) just the information which keys
you pressed on your keyboard for how long, with which velocity, probably subsequent force
change ("aftertouch"); that means the overall amount of data will always be
small, no matter how long your song will be, and no matter how many tracks
you will keep.
Add Track
 To create a new track, simply hit the large "+" button at the end of the
tracks list. This will add a new, empty track to the end of the track list.
To create a new track, simply hit the large "+" button at the end of the
tracks list. This will add a new, empty track to the end of the track list.
Delete Track
To delete a track, tap on the red "X" button at the right end of the
respective track. The MIDI data stored with the respective track will be
deleted and cannot be restored after this operation.
Track Names
On the right half of each track you find its name in hand-writing font. To rename a track, simply tap on the track name and enter a new name for the respective track.
MIDI Channel
 On the left end of each track you can read its current MIDI channel. The
MIDI channel defines which sound of your app is going to be played with that
track. So you are not selecting a specific sound of your app directly with each track,
instead you are selecting a MIDI channel number on the track which should match
with the MIDI channel number configured on
the part (sound generator) which is configured with the sound (instrument)
you want to use for that track. This approach has certain advantages over
selecting a specific sound directly on each track: for example you may
configure several parts to use the same MIDI channel number and hence you may
use only one MIDI track to play several sounds "layered" simultaniously.
On the left end of each track you can read its current MIDI channel. The
MIDI channel defines which sound of your app is going to be played with that
track. So you are not selecting a specific sound of your app directly with each track,
instead you are selecting a MIDI channel number on the track which should match
with the MIDI channel number configured on
the part (sound generator) which is configured with the sound (instrument)
you want to use for that track. This approach has certain advantages over
selecting a specific sound directly on each track: for example you may
configure several parts to use the same MIDI channel number and hence you may
use only one MIDI track to play several sounds "layered" simultaniously.
To change the MIDI channel of a track, use the "+" and "-" buttons next to the displayed MIDI channel number on the left side of the track's strip.
Arming a Track
 Before starting to record, you need to arm at least one of the tracks.
That means you need to select at least one track for being recorded to. You
can do so by tapping on the button on the very left end of the respective
track (having a red circle and an arrow pointing at it).
Before starting to record, you need to arm at least one of the tracks.
That means you need to select at least one track for being recorded to. You
can do so by tapping on the button on the very left end of the respective
track (having a red circle and an arrow pointing at it).
After arming the respective track, and probably seeking to the respective song position, you may simply tap on the Record button from the main controls to start recording to the selected track. Once you are done, press the Stop button to stop recording.
Muting Tracks
 You may press the "Mute" button on tracks that you want to be ignored by the
player regarding playback. A muted track will simply not trigger any notes and
thus will remain silent during playback. This might also affect recording,
because when you already recorded something on a track before, and when you
then start recording again, the already recorded MIDI data on your tracks will
be played back during recording as well. If that is disturbing for you then
mute the respective tracks, or even use the Solo button described next.
You may press the "Mute" button on tracks that you want to be ignored by the
player regarding playback. A muted track will simply not trigger any notes and
thus will remain silent during playback. This might also affect recording,
because when you already recorded something on a track before, and when you
then start recording again, the already recorded MIDI data on your tracks will
be played back during recording as well. If that is disturbing for you then
mute the respective tracks, or even use the Solo button described next.
Solo Track
 This is somewhat similar to muting tracks. By activating the "Solo" button on a
track this will cause the player to mute all tracks, except the track on which
the "Solo" button is currently active. So you might want to use this to quickly
turn all tracks silent except a particular track.
This is somewhat similar to muting tracks. By activating the "Solo" button on a
track this will cause the player to mute all tracks, except the track on which
the "Solo" button is currently active. So you might want to use this to quickly
turn all tracks silent except a particular track.
Track Activity
 On each track you find a blue "Activity" light. It flashes up whenever a MIDI
event occurred on the respective track. This does not mean that this light is
lit up as long as a note is active (audible) on the track (i.e. on a long sustained note), it rather is lit up
for a short moment when the respective note is triggered, and when it is
released. That's because this light is just reflecting MIDI data activity on
the track.
On each track you find a blue "Activity" light. It flashes up whenever a MIDI
event occurred on the respective track. This does not mean that this light is
lit up as long as a note is active (audible) on the track (i.e. on a long sustained note), it rather is lit up
for a short moment when the respective note is triggered, and when it is
released. That's because this light is just reflecting MIDI data activity on
the track.
Tempo Control
There is not just one, but actually two prominent rotary knobs on the player's user interface, which are both intended to control the tempo of your song. You find one on the left, and the other on the right side of the player's main controls. Why is that?
 This player/recorder is designed to cope with the requirements of classical
music genres, which are commonly using frequent tempo changes during songs to
add more dynamics to the perceiption of song parts. When you playback an
already existing MIDI song which already got tempo change information inside, you will
observe that the value of the BPM knob, and the precise BPM value diplayed on
the blue virtual display change during playback.
This player/recorder is designed to cope with the requirements of classical
music genres, which are commonly using frequent tempo changes during songs to
add more dynamics to the perceiption of song parts. When you playback an
already existing MIDI song which already got tempo change information inside, you will
observe that the value of the BPM knob, and the precise BPM value diplayed on
the blue virtual display change during playback.
You can also do that with your own songs, recorded with this recorder: To do
that, arm a track where you want the tempo change information to be recorded to.
Then start recording. At the desired song positions rotate the "BPM" knob to
the respective new tempo (in beats per minute). As soon as you need no more
additional tempo changes, stop recording.
Now when you playback your song again, your will observe that the player is
changing the tempo at all song positions exactly like you recorded them.
 Now consider you want to playback a classic orchestra song with a load of
tempo changes inside. Let's say further you wanted the overall playback speed
to turn down to the half. For example to listen more precisely to some critical,
fast rythm sections of the song. You could use the "BPM" knob during playback
for that, however it will always collide with all the tempo changes that are
already stored with the song. You turn down to e.g. 40 BPM, but after a second,
the song's tempo track causes the players tempo to jump back to 105 BPM. That's
not really what you want.
Now consider you want to playback a classic orchestra song with a load of
tempo changes inside. Let's say further you wanted the overall playback speed
to turn down to the half. For example to listen more precisely to some critical,
fast rythm sections of the song. You could use the "BPM" knob during playback
for that, however it will always collide with all the tempo changes that are
already stored with the song. You turn down to e.g. 40 BPM, but after a second,
the song's tempo track causes the players tempo to jump back to 105 BPM. That's
not really what you want.
Instead, you rather want to use the "Tempo Zoom" dial knob in this case. With this second
tempo control knob you have a more global control of the overall tempo of the
song, without actually touching or interfering with the tempo track information.
It is like a tempo factor that is applied against all tempo changes of your song at once - without ever touching them.
Or you can see it like a slow-motion control knob of a video recording system.
Even when the recorded people on such a video recorder system move sometimes a
bit faster, sometimes slower; by using the slow-motion control they will all
relatively slow down or speed up, without changing the impression of their
movements. And due to that slow-motion analogy, this knob is called "Tempo Zoom".
Movements of this "Tempo Zoom" knob will never be recorded.
Importing Songs
There are currently two ways to import already existing MIDI files to the built-in MIDI player of your Crudebyte audio app, which are described next.
Open MIDI File with ...
The probably most easiest way to get existing songs into your player is to either download them as MIDI (.mid) file with your iPad's / iPhone's Safari Internet Browser, and then use the "Open with ..." function to open the MIDI file with the preferred app (e.g. with iSymphonic Orchestra), or send the MIDI file to yourself attached to an Email and open it with the Mail App on your iPad / iPhone, then also use the "Open with ..." function to open the MIDI file with the preferred app (e.g. with iSymphonic Orchestra). Note that this feature is not limited to Apple's own apps, you may also download and open MIDI files this way with any other third-party app on your iPad / iPhone, as long as the respective third-party app supports the operating system's "Open file with ..." feature.
Upload MIDI File with iTunes Software
You may also use Apple's iTunes Software to import and export files to your
iPad / iPhone. You need to have a Mac or PC for this and Apple's iTunes
software needs to be installed on your Mac / PC. Then follow these instructions
to upload MIDI files from your Mac / PC to your Crudebyte audio app:

- Connect your iPad / iPhone with USB cable to your Mac / PC.
- Start the iTunes application on your Mac / PC.
- Click on the small symbol of your iPad / iPhone, which you can find top left on the iTunes application window.
You should now see a new screen with coarse information about your attached iPad / iPhone. At the "Setting" list tap on "file sharing" (1) and subsequently on the icon of the provided app (2). This opens a list of this app's currently stored Midi files. Add a new Midi file in the easiest way by "drag and drop". On Mac you usually use the standard file manager application Finder window to navigate to the directory where your MIDI files are located, then drag the respective MIDI file from the Finder window into the iTunes application window like described above. You may also mark and drag multiple files simultaniously to import them altogether with one operation.

The imported files are now immediately available with your Crudebyte audio app. You may now open them under "Files" on the MIDI Player/Recorder screen of your app on your iPad / iPhone.
Exporting Songs
Exporting Midi Files
The easiest way to export MIDI files is the inverse handling with iTunes like described above at
Importing Songs with iTunes Software, this means: Drag it from the visible list in iTunes and drop it into the intended directory.
An alternative method is described in the next paragraph.
global.conf in the images
above, this file contains your current setup of the entire application. You
may download and upload this file between your iPad / iPhone and Mac / PC like described
above, for example for backup reasons or to launch the same setup on several
iOS devices.
Exporting Audio Files
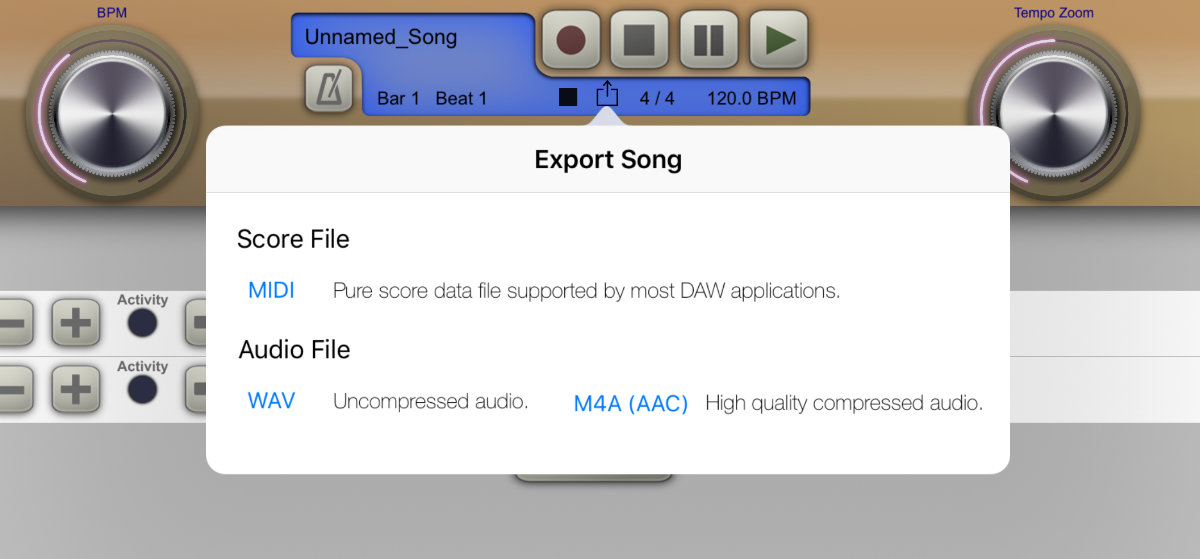 You can also share your recorded songs very conveniently directly from the recorder screen.
You don't need to attach your iPad/iPhone with a Mac or PC to achieve that.
To do that, the built-in recorder features
an export functionality, which you can use to quickly send your song either as MIDI file,
or as a pre-rendered audio file to your colleagues, friends, or for loading your songs to your
cloud or app of your choice with just two taps.
Simply tap on the Export Song symbol and follow the dialog to send your song in the
desired file format.
You can also share your recorded songs very conveniently directly from the recorder screen.
You don't need to attach your iPad/iPhone with a Mac or PC to achieve that.
To do that, the built-in recorder features
an export functionality, which you can use to quickly send your song either as MIDI file,
or as a pre-rendered audio file to your colleagues, friends, or for loading your songs to your
cloud or app of your choice with just two taps.
Simply tap on the Export Song symbol and follow the dialog to send your song in the
desired file format.
Advanced Settings
The following section is intended for users who are already using this player / recorder for a while, and are interested in more in-depth configuration options regarding this player / recorder.
Arming multiple Tracks
By default the recorder is configured to allow arming of only one track at a time. So whenever you arm another track for recording, the previously armed track automatically gets disarmed. This is done to avoid confusion for new users of the recorder. However you can also configure the recorder to allow arming multiple tracks. That way you will be able to record to multiple tracks simultaniously. To do that, go onto the settings screen of your Crudebyte audio app, which you can reach by tapping on the small gear wheel icon on the very top of app's main screen. Scroll down the settings screen to section "Player / Recorder". You will find the following two switches to configure recording to multiple tracks. The precise behavior they cause is described next:
 1st option: This is the default setting after installing the app. In
this configuration the app only allows to always arm only one track at a time, other tracks
automatically get disarmed. Also, in this configuration all incoming MIDI data
will be recorded to the armed track, no matter on which MIDI channel the MIDI
data is incoming, and no matter for which MIDI channel the respective track is
currently configured for. This is also intended to ease the entry phase for
new users working with the recorder for the first time, so they don't have to
take care about MIDI channel settings at all, neither with their external MIDI
keyboard, nor with the app. In fact, this configuration is probably the most
appropriate one for the majority of all users.
1st option: This is the default setting after installing the app. In
this configuration the app only allows to always arm only one track at a time, other tracks
automatically get disarmed. Also, in this configuration all incoming MIDI data
will be recorded to the armed track, no matter on which MIDI channel the MIDI
data is incoming, and no matter for which MIDI channel the respective track is
currently configured for. This is also intended to ease the entry phase for
new users working with the recorder for the first time, so they don't have to
take care about MIDI channel settings at all, neither with their external MIDI
keyboard, nor with the app. In fact, this configuration is probably the most
appropriate one for the majority of all users.
 2nd option: In this configuration you may arm more than one track,
thus it allows you to record to multiple tracks simultaniously. However note
that the recorder will still ignore on which MIDI channel data the respective
MIDI data is incoming, and hence it will record the same MIDI data to all
armed tracks. So you end up with a copies of the recorded MIDI data on all of
those armed tracks.
This configuration is thus somewhat exotic and probably only few users might
want to configure the recorder in this way.
2nd option: In this configuration you may arm more than one track,
thus it allows you to record to multiple tracks simultaniously. However note
that the recorder will still ignore on which MIDI channel data the respective
MIDI data is incoming, and hence it will record the same MIDI data to all
armed tracks. So you end up with a copies of the recorded MIDI data on all of
those armed tracks.
This configuration is thus somewhat exotic and probably only few users might
want to configure the recorder in this way.
 3rd option: In this configuration you may also arm more than one track at a time,
and thus it also allows you to record to multiple tracks simultaniously. This
is the recommended configuration if you want to record to multiple tracks
simultaniously. Note however that in this configuration it matters on which
MIDI channel your external MIDI keyboard is sending, and for which MIDI
channel your armed tracks are configured for
(see how to configure the MIDI channel of a track).
In this configuration the respective armed track will only record MIDI data
for which it is currently configured for. MIDI data of all other MIDI channels
will be ignored. So this way you may record an incoming MIDI stream, separated
on different MIDI channels, and record them to separate tracks.
3rd option: In this configuration you may also arm more than one track at a time,
and thus it also allows you to record to multiple tracks simultaniously. This
is the recommended configuration if you want to record to multiple tracks
simultaniously. Note however that in this configuration it matters on which
MIDI channel your external MIDI keyboard is sending, and for which MIDI
channel your armed tracks are configured for
(see how to configure the MIDI channel of a track).
In this configuration the respective armed track will only record MIDI data
for which it is currently configured for. MIDI data of all other MIDI channels
will be ignored. So this way you may record an incoming MIDI stream, separated
on different MIDI channels, and record them to separate tracks.
4th option: In this configuration only one track may be armed at a time,
and the respective armed MIDI channel is only recording MIDI data sent on the
MIDI channel the armed track is configured for.
This is also a somewhat rather exotic option. You may want to use it if your
external MIDI devices are sending on multiple MIDI channels and you only want
to record the MIDI data of only one MIDI channel of it.
MIDI Program Change
The app also allows you to configure whether the recorder shall playback so called MIDI Program Change messages that might be stored on your MIDI tracks. Those MIDI messages can be used to tell the app to switch to another sound. So you might use them at the beginning of your song to automatically select the respective sounds on the parts you are using for your song, or you might also use them somewhere during your song to switch to another sound programmatically for that track.
 Since many MIDI files on the Internet contain MIDI Program Change messages, the
default setting is to simply ignore MIDI Program Change messages
to avoid especially potential confusion of new users of this app.
Since many MIDI files on the Internet contain MIDI Program Change messages, the
default setting is to simply ignore MIDI Program Change messages
to avoid especially potential confusion of new users of this app.