Advanced Usage
The following instructions are intended for users who are already familiar with the iSymphonic Orchestra App and who are interested in more in-depth topics regarding this app. If you are using iSymphonic Orchestra for the first time, then please refer to the introductional chapter of this manual first.
Finding Sounds
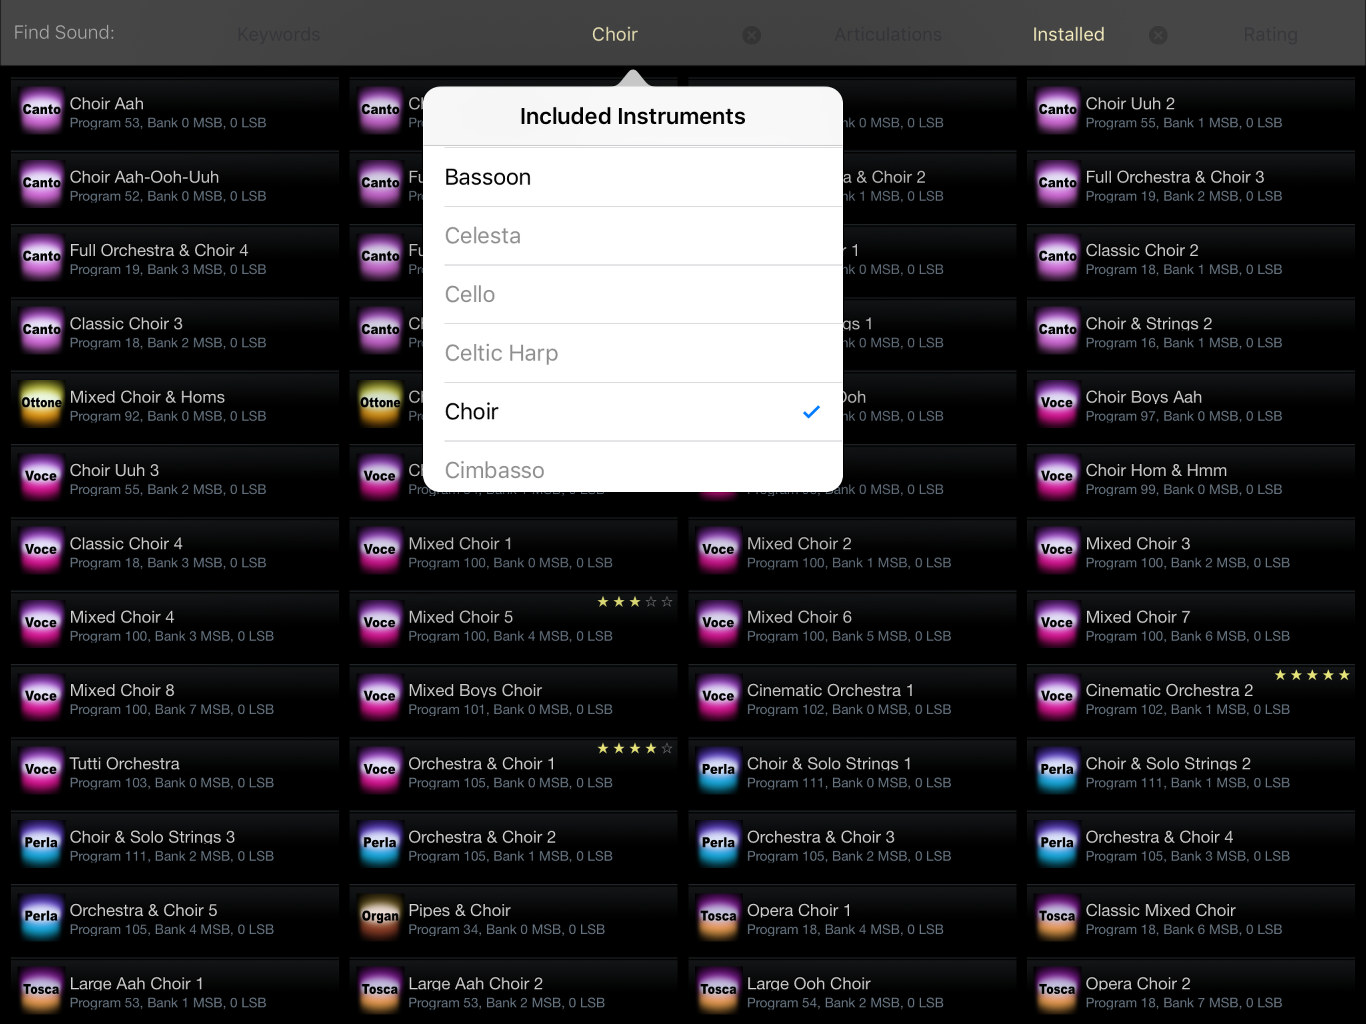
Since iSymphonic Orchestra provides a large amount of sounds, the app also helps you to find exactly the sounds you are seeking for, whenever you need them. When you tap on the sound combo box, the list of available sounds pops up in full screen. By default this sound list first shows you all the sounds that are available with the app.
Filter Options
Additionally this sound selection screen provides various interactive filter options, located at the very top of the screen, which help you to find your sounds in a very easy and quick way. As soon as you picked or altered a search criteria, you will notice that the list updates immediately according to what you are searching for.

- Keywords: Enter arbitrary search keyword(s), either with the on-screen text input keyboard, or with an external wireless Bluetooth keyboard. While you are typing your search keywords, the list automatically updates in real-time, showing you just the sounds that match you search criteria, which may be anything like the sound name, the (real) instruments contained in the sounds, articulations, or anything else related with the respective sound.
- Instruments: Use this list to easily tap on (real) instruments which should be contained in the sounds you are looking for. You may select more than one instrument from that option list, for example tap on "Choir" and "Bassoon" to find all sounds which at least contain a choir and at least one Bassoon player.
- Articulations: Use this list to select the playing style, typically referred to as "Articulations" by musicians, which should be covered by the sounds you are searching for. For example by selecting "Staccato" it will show you sounds which cover this particular playing style of short and significantly loud notes.
- Status: This option allows you to define whether you are interested in all sounds provided by iSymphonic Orchestra, or whether you only want to search among the sounds you currently really have installed on your device at this moment.
- User Rating: iSymphonic also allows you to rate the individual sounds, which is described a bit more down later. This option category allows you to search for sounds which were already rated by you with at least the hereby selected amount of stars.
User Rating
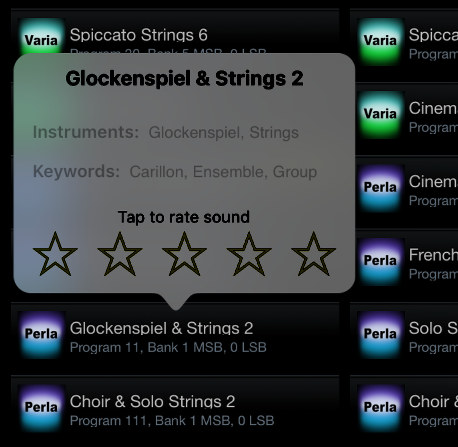 By long tapping on a sound from the list, a popup will appear which shows you more details
about that particular sound. It also allows you to rate the quality of the sound by tapping
on one of the five stars. After you rated the sound, the respective amount of stars will
also be shown on the right hand side of the sound's name in the list, which helps you to
visually spot your favorite sounds directly by just looking at the list.
By long tapping on a sound from the list, a popup will appear which shows you more details
about that particular sound. It also allows you to rate the quality of the sound by tapping
on one of the five stars. After you rated the sound, the respective amount of stars will
also be shown on the right hand side of the sound's name in the list, which helps you to
visually spot your favorite sounds directly by just looking at the list.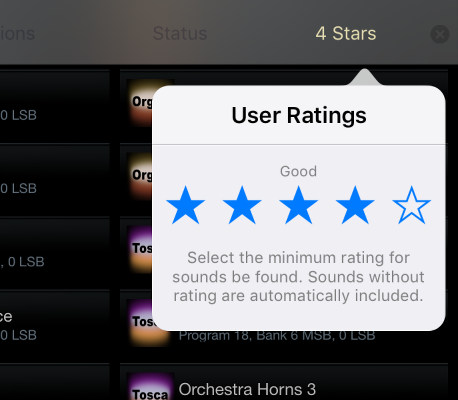
Then you might also use the "Rating" filter option to just list the sounds which
have at least the given amount of stars. For example by selecting 4 stars from this filter,
only sounds are listed which were rated by you with 4 stars or 5 stars.
Virtual Keyboard
 Even if you are a serious, conservative composer, we really encourage you to also use the
on-screen keyboard as well. You will be surprised how many new musical ideas pop up
from your mind immediately, simply because the virtual keyboard automatically kicks
you out from your usual mechanical playing patterns of a real MIDI keyboard!
Even if you are a serious, conservative composer, we really encourage you to also use the
on-screen keyboard as well. You will be surprised how many new musical ideas pop up
from your mind immediately, simply because the virtual keyboard automatically kicks
you out from your usual mechanical playing patterns of a real MIDI keyboard!
The previous chapter already described how to
enlarge, shrink and scroll
the virtual on-screen piano keyboard. For changing the appearance and behaviour of the
virtual keyboard you need to unfold the keyboard's toolbar to get access to its additional buttons.
To do so, simply tap on the right-arrow button to open the keybard's toolbar.
Touch Velocity
One of the most important features of a real piano keyboard is the ability to control the general sound characteristics of individual notes by pressing down the individual piano keys with different velocities. So if you press down a key with a high velocity, the note would be loud and harsh, if you press the key gently the sound would be rather gentle and soft. To replicate this behavior appropriately on a touch screen is a technical challenge.
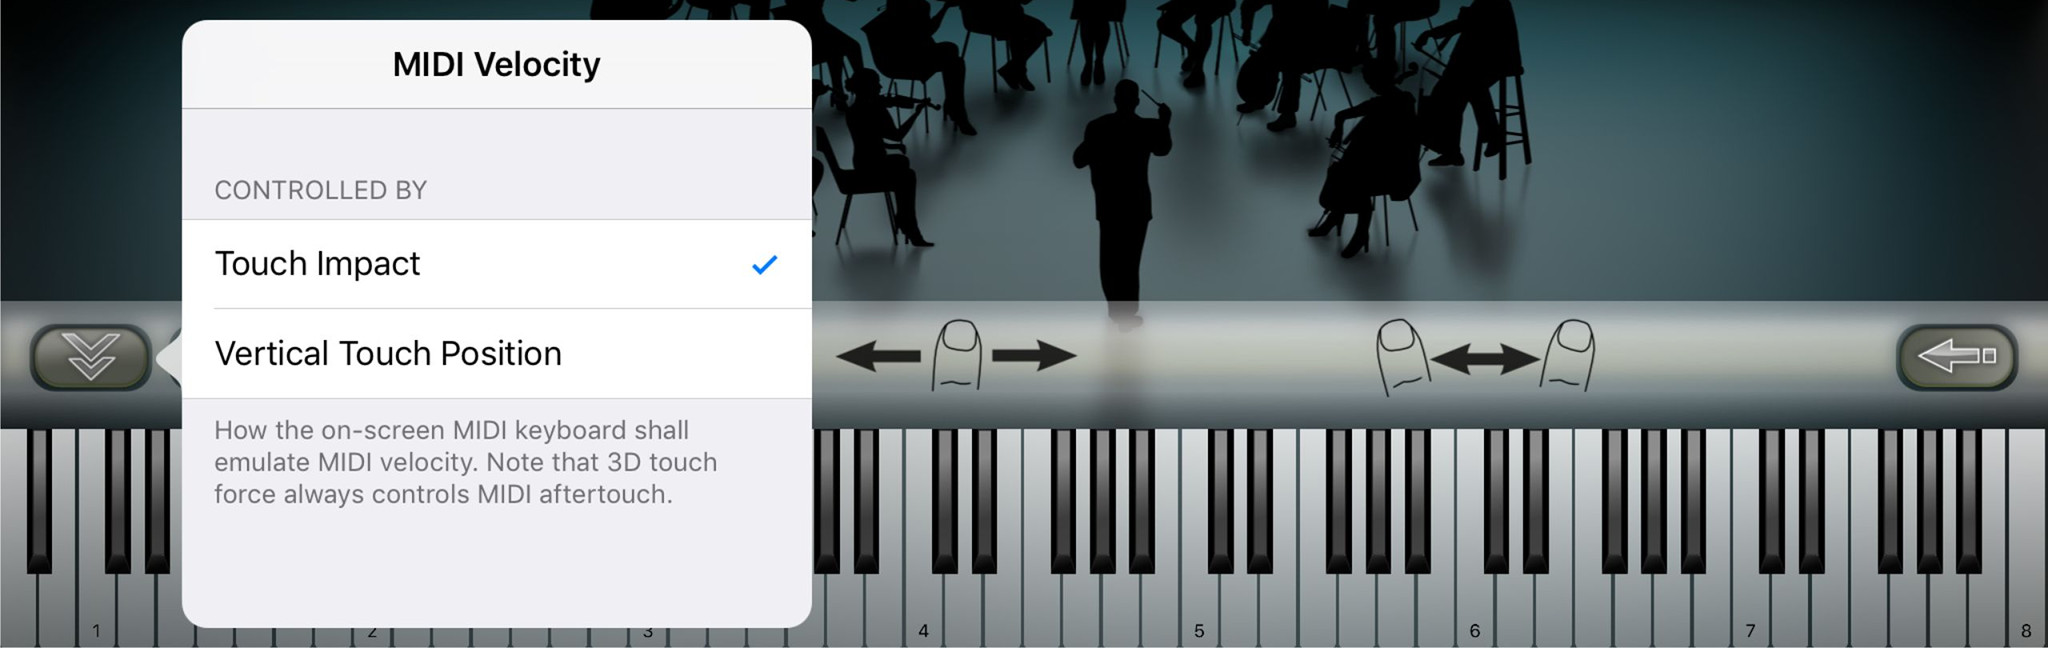
There are two different ways to replicate such note velocities with the virtual on-screen keyboard, and the keyboard's toolbar allows you to switch between those two distinct behaviours of the keyboard.
- Touch Impact: In this mode, the virtual keyboard tries to emulate a velocity depending on how quickly your fingers hit the screen. This works with any iOS device, so it is not limited to iOS devices supporting 3D touch force. Please note though that the precision of the information, apps get from the operating system, reduced dramatically with recent iOS versions. That's why this is not longer the default behavior with iSymphonic Orchstra anymore.
- Vertical Touch Position: This is the default behaviour of the virtual keyboard, i.e. initially after installation of the app. In this mode the virtual keyboard emulates a velocity information depending on the vertical position of your finger on the respective virtual piano key. Tapping on the bottom of a key generates a higher velocity, tapping on the top of a key generates a lower velocity instead.
Transpose
Another important aspect to control is the keyboard's transpose setting. By transposing with
the selected amount of semi-tones or octaves, the notes you play will accordingly sound
higher or lower respectively. This setting is actually not simply altering the transpose of the
virtual keyboard, instead it actually transposes the
currently selected part. That means
when you change the transpose setting this way, also notes you play with an external MIDI
keyboard for instance will also sound higher or lower according to the selected amount of
semi-tones or octaves. And since this setting is on a per part level, you may use different
transpose settings for individual sounds you play.
To reset quickly all transpose setting to 0, tap both buttons simultaniously.
![]()
External MIDI Devices
iSymphonic Orchestra was designed to be very easily and intuitively usable, which also means that you should be able to use the app immediately, without requiring any software configuration. For that reason for instance, iSymphonic Orchestra connects automatically by default to all MIDI equipment that you may attach to your iOS device without requiring any software configuration. That means: As soon as you attach external MIDI equipment with your iPad, iPod or iPhone, you are ready to play! Learn how to connect external MIDI hardware with your iPad or iPhone ...
Select MIDI Devices
 Obviously, the previously described default behaviour is fine for many situations, especially when you are
using the app for the first time, but it may not always be what you want. That's why you can also override
this automatic selection of MIDI devices and instead manually pick only the ones you really want to use instead.
Obviously, the previously described default behaviour is fine for many situations, especially when you are
using the app for the first time, but it may not always be what you want. That's why you can also override
this automatic selection of MIDI devices and instead manually pick only the ones you really want to use instead.
As you can see on this screen shot, the app allows you to select from any kind of MIDI source, not limited to
only external MIDI hardware devices, but also third-party apps that may be running on your iOS device
simultaniously. All MIDI sources with a check mark are currently connected with iSymphonic Orchestra.
MIDI sources marked as "Offline" are sources which were previously available, but are currently
not available to the operating system. So if you see your prefered, external MIDI keyboard displayed as
being "offline", then please check the connectors, cables and adapters being involved.
This screen also allows you to quickly pair your external Bluetooth MIDI equipment in this context,
if required.
1
even though you have no external MIDI equipment attached to your iPad / iPhone
at that moment. This is not an error. Usually that means you used iOS's so
called Network MIDI feature before, which will remain visible like a
regular MIDI hardware device for the entire system.
If your external MIDI devices (or third-party apps) are displayed as being connected, and the app is still not reacting as expected by you, then please also check the following configuration topics:
- Make sure you read the notes about the multi-part feature of this App.
- Check whether the MIDI channel of the respective part is configured correctly.
Velocity Response Curve
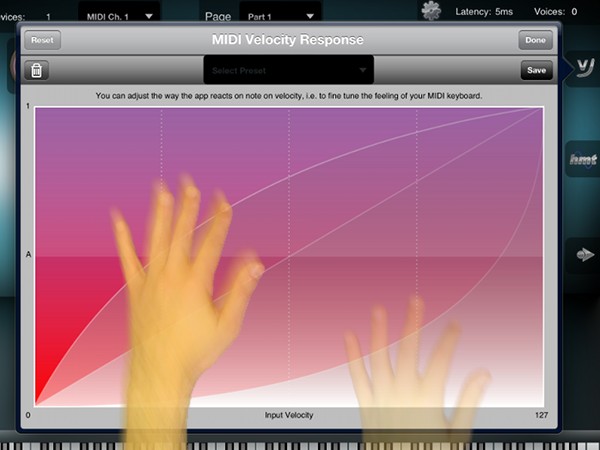 You may adjust the so called velocity response with the velocity
response curve editor, as shown on the left. The velocity response curve
defines the relation between MIDI note-on velocity values (0 ... 127) and the
resulting instrument's volume (0 ... 1). In other words: it controls the precise volume
depending on how fast you trigger a key on your external MIDI keyboard. This is
commonly used to adjust the feeling of individual MIDI keyboards according to your
prefered playing style and taste.
You may adjust the so called velocity response with the velocity
response curve editor, as shown on the left. The velocity response curve
defines the relation between MIDI note-on velocity values (0 ... 127) and the
resulting instrument's volume (0 ... 1). In other words: it controls the precise volume
depending on how fast you trigger a key on your external MIDI keyboard. This is
commonly used to adjust the feeling of individual MIDI keyboards according to your
prefered playing style and taste.
Simply place one finger onto the curve and drag your finger around on the screen
to bend the velocity response curve to the desired shape. You hear the result
of the velocity curve change as soon as you lift up your finger from the screen.
You may save the current velocity response curve as preset by tapping on the
"Save" button. A popup will appear on your screen: enter a name for the new
preset and confirm saving the new preset.
To restore a previously saved velocity response curve preset, select one preset
from the combo box (available on the very top of the velocity response curve editor). As soon as you
tapped on an item from the velocity response preset list, that preset becomes
immediately audible.
To restore the velocity response curve to its default setting (a neutral linear),
tap on the "Reset" button. The change becomes immediately audible.
To delete a previously saved velocity response curve preset, select the preset
with the preset combo box first, then tap on trash can button on the upper left
side of the velocity response curve editor.
Pitchbend Range
 Another common approach to control a sound in real-time is the so called pitchbend wheel,
which allows you to continuously alter the pitch of the currently active notes by simply turning
this dedicated wheel at your MIDI keyboard. So rotating this dedicated wheel on your keyboard makes the currently
playing sounds higher or lower in real-time.
Another common approach to control a sound in real-time is the so called pitchbend wheel,
which allows you to continuously alter the pitch of the currently active notes by simply turning
this dedicated wheel at your MIDI keyboard. So rotating this dedicated wheel on your keyboard makes the currently
playing sounds higher or lower in real-time.
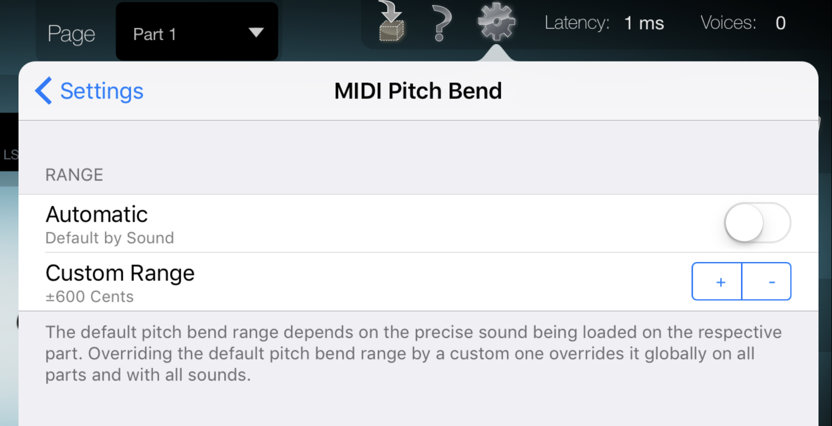
The pitch range of the MIDI pitch bend wheel is pre-assigned by us for each individual sound.
For the majority of our sounds the default pitch bend range is ± 200 cents. (that is ± 2 semi tones).
You can also override the pitch bend range on the app's settings screen. You may decrease it
to only few cents, or rather increase it to a range of up to 2 octaves.
Tuning
 For professional musicians, as well as for musicians of non-western musical genres, scales and
frequency tuning settings is a must-have feature. All aspects of tuning involved in iSymphonic
Orchestra are available from the dedicated tuning screen which you can reach by tapping on the
small tuning fork icon. Please note that in contrast to many other music apps, iSymphonic Orchestra
not only provides static scale tuning, but also dynamic scale tuning, and the app's tuning screen
makes a clear distinction between those two different types of adjusting the tuning of
individual notes.
For professional musicians, as well as for musicians of non-western musical genres, scales and
frequency tuning settings is a must-have feature. All aspects of tuning involved in iSymphonic
Orchestra are available from the dedicated tuning screen which you can reach by tapping on the
small tuning fork icon. Please note that in contrast to many other music apps, iSymphonic Orchestra
not only provides static scale tuning, but also dynamic scale tuning, and the app's tuning screen
makes a clear distinction between those two different types of adjusting the tuning of
individual notes.
Mastertune
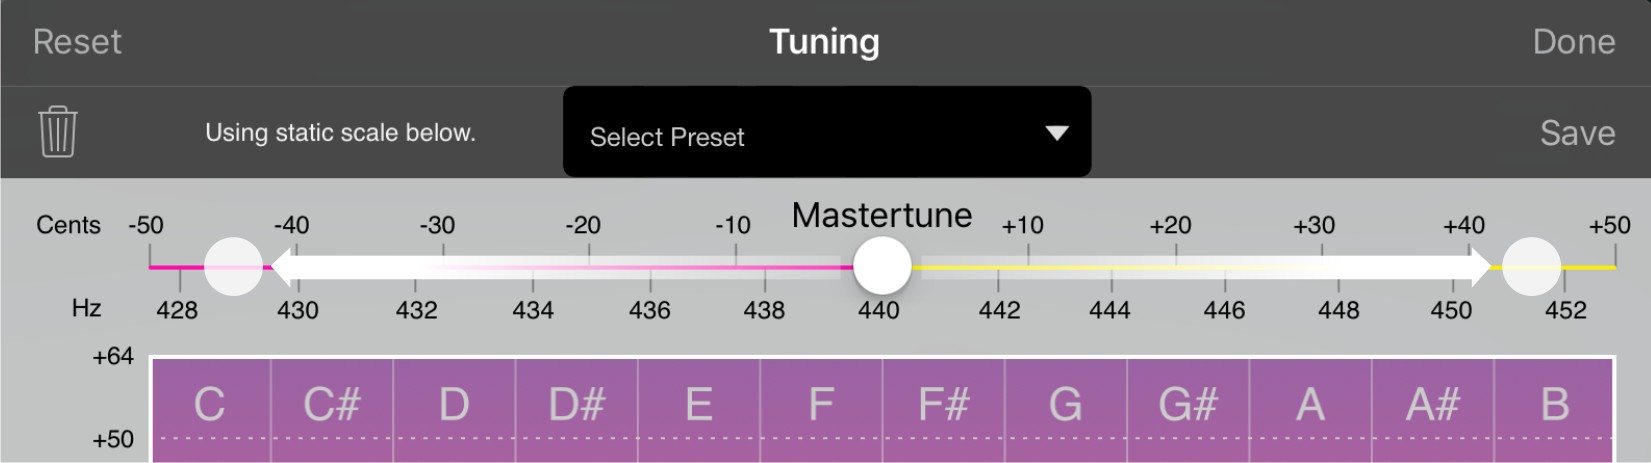 The master tune setting allows you to raise or lower the global tuning of all notes to be played.
By default it is set to the common
standard pitch of
The master tune setting allows you to raise or lower the global tuning of all notes to be played.
By default it is set to the common
standard pitch of A=440 Hz. Dragging the master tune slider to the left will lower the
app's global overall pitch, dragging the slider to the
right will raise the global pitch. The master tune setting affects all notes being played, not just
individual ones.
Static Scale Tuning
 Apart from changing the global tuning of all notes, you may also change the tuning of individual
notes of the scale. As previously mentioned, there are two distinct approaches for scale tuning in iSymphonic.
With static scale tuning you are tuning individual notes of a scale and this tuning
of the individual notes remains unchanged while you are playing, hence static. Static scale tuning
is especially required for non-western music, since they are often using different staves, that is
scales where (in contrast to popular western music) the notes of a scale are not using equally
distributed frequency ratios to each other.
Apart from changing the global tuning of all notes, you may also change the tuning of individual
notes of the scale. As previously mentioned, there are two distinct approaches for scale tuning in iSymphonic.
With static scale tuning you are tuning individual notes of a scale and this tuning
of the individual notes remains unchanged while you are playing, hence static. Static scale tuning
is especially required for non-western music, since they are often using different staves, that is
scales where (in contrast to popular western music) the notes of a scale are not using equally
distributed frequency ratios to each other.
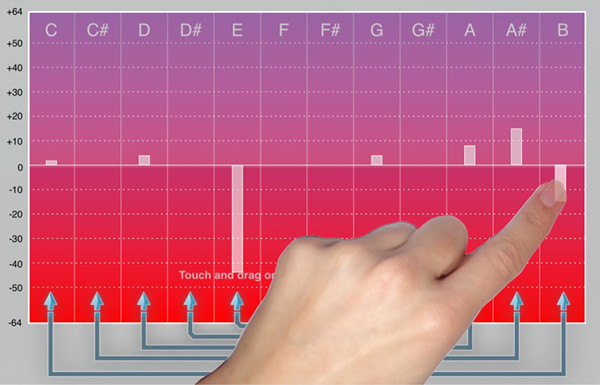
To create your own (static) scale tuning, start by selecting the tuning preset
"Neutral Scale (Static)" or by selecting any other static scale preset which might be close to the
scale you want to achieve. Then start to adjust the scale by simply tapping on the vertical note
strips and dragging your finger downwards or upwards to adjust the tuning of the respective note.
You will see that a vertical bar will follow your finger movement and you can also immediately hear
the change in tuning in real-time.
Dynamic Scale Tuning
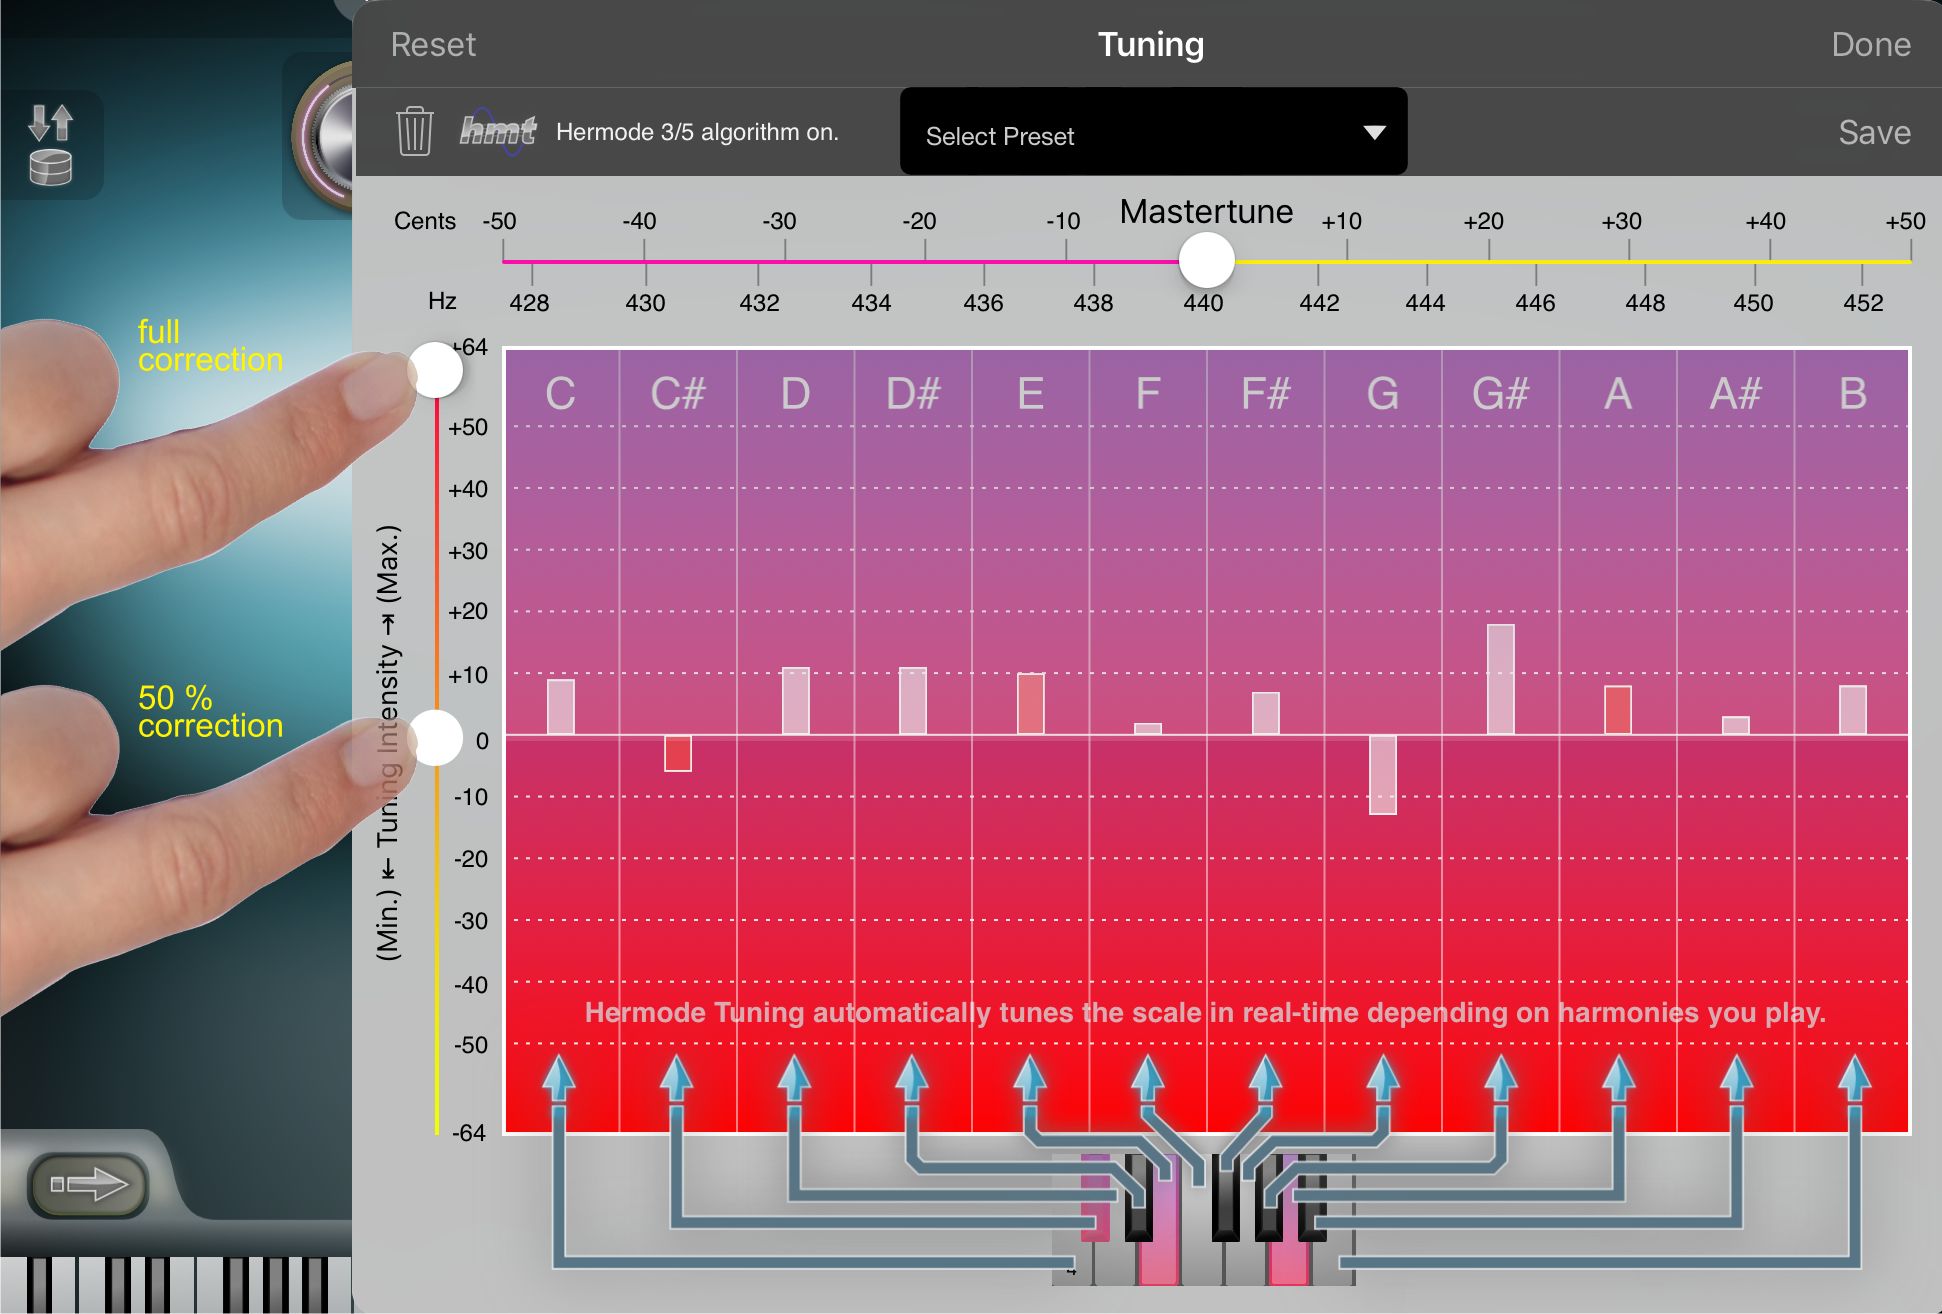 The second overall approach that affects the tuning of individual notes is dynamic scale tuning.
In this mode you are not manually adjusting the tuning of individual notes by yourself, instead an
algorithm called Hermode Tuning is automatically adjusting the tuning of the individual notes
in real-time for you, depending on which notes you are currently playing. That means in this mode you
play a chord and you will immediately see and hear how the tuning of individual notes changed
automatically. The bars of the individual notes on the tuning screen autonomously move up and down
accordingly. So dynamic scale tuning (or Hermode Tuning) fulfills a completely different purpose
than static scale tuning. Whereas static scale tuning is mostly intended to resemble the sound of
non-western music; dynamic scale tuning on the other hand is actually intended to improve the sound
of western music instead.
The second overall approach that affects the tuning of individual notes is dynamic scale tuning.
In this mode you are not manually adjusting the tuning of individual notes by yourself, instead an
algorithm called Hermode Tuning is automatically adjusting the tuning of the individual notes
in real-time for you, depending on which notes you are currently playing. That means in this mode you
play a chord and you will immediately see and hear how the tuning of individual notes changed
automatically. The bars of the individual notes on the tuning screen autonomously move up and down
accordingly. So dynamic scale tuning (or Hermode Tuning) fulfills a completely different purpose
than static scale tuning. Whereas static scale tuning is mostly intended to resemble the sound of
non-western music; dynamic scale tuning on the other hand is actually intended to improve the sound
of western music instead.
At first glance this might sound like an exotic software feature to you,
but this algorithm is actually resembling the behaviour of professional orchestra players and choirs,
which are trained to slightly adjust the tuning of individual notes to achieve higher purity in
the current harmonies they play. Find out more about Hermode Tuning ...
For the theoretical aspects of Hermode Tuning please follow the previous link which outlines its background
in detail as a separate article. For configuring dynamic scale tuning there are exactly two aspects to control
the behaviour (and thus the result) of the dynamic tuning algorithm:
- Hermode Tuning Mode: There are currently two modes for dynamic scale tuning, which you may switch to by selecting either "Hermode 3rd/5th (Dynamic)" or "Hermode 3rd/5th/7th (Dynamic)" from the tuning presets drop down list. The two items "Hermode 3rd/5th (Dynamic)" and "Hermode 3rd/5th/7th (Dynamic)" call two different algorithms for dynamic tuning corrections. The first one controls dynamically the 3rds and 5ths to just intonation, the second one controls additionally the diminished seventh in dominant seventh chords (e.g. the F in G-B-D-F) to just intonation.
- Tuning Intensity: The vertical slider on the left hand side of the individual note's tuning graph allows you adjust the impact of the dynamic scale tuning algorithm. At the slider's highest position the individual notes are corrected with max. tuning intensity. At the slider's lowest position this would result in no dynamic tuning at all, so this would behave like dynamic tuning was completely switched off, and effectively the latter would mean Equal Temperament tuning. A slider value of about 70% is recommended when making music together with additional musical instruments which are tuned to Equal Temperament.
Tuning Presets
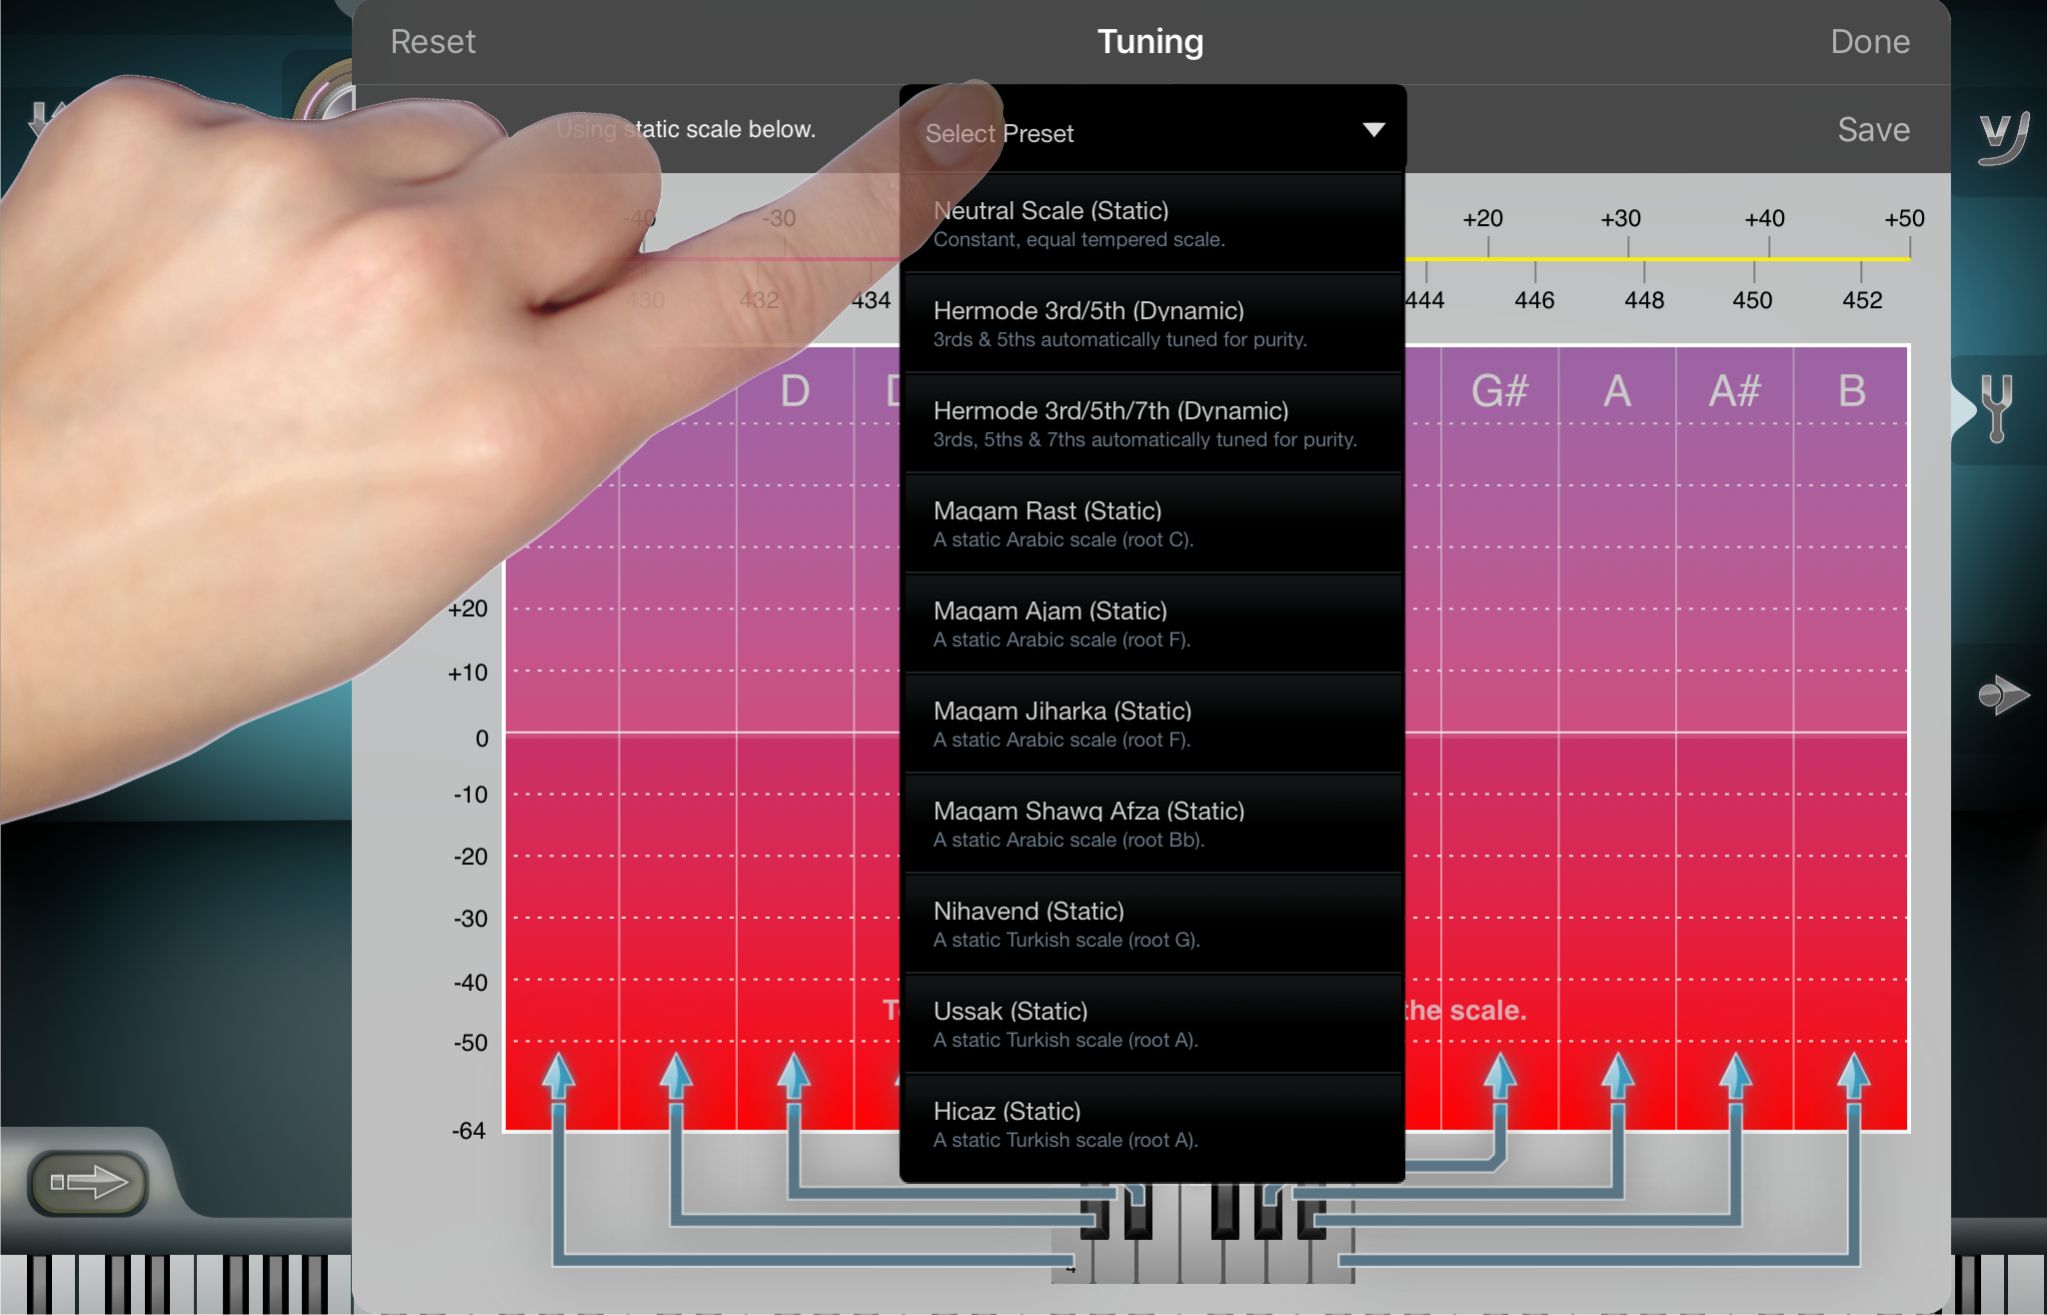 iSymphonic Orchestra comes with a number of factory presets for common tuning settings. These factory
presets may lead you as a basis to quickly achieve the tuning setup you are seeking for. The factory
tuning presets encompass the previously described two dynamic Hermode Tuning modes, as well
as a number of popular Arab and Turkish scales. And on the very top of the preset list you find the
entry "Neutral (Static Scale)" which is the default tuning setup as expected by most western musicians.
iSymphonic Orchestra comes with a number of factory presets for common tuning settings. These factory
presets may lead you as a basis to quickly achieve the tuning setup you are seeking for. The factory
tuning presets encompass the previously described two dynamic Hermode Tuning modes, as well
as a number of popular Arab and Turkish scales. And on the very top of the preset list you find the
entry "Neutral (Static Scale)" which is the default tuning setup as expected by most western musicians.
Of course you can also create your own tuning presets. Simply start by selecting one of the factory presets
which may come close to the setup you want to achieve, then adjust the tuning settings as previously described
in this chapter. Finally tap on "Save" to save your tuning setup as a new tuning preset. You will now find your
own preset in the tuning presets list.
Polyphony
For each note you trigger, a certain amount of so called voices are spawned by the app's audio engine. A voice is one instance of an engine internal sound generating object, each streaming its own sample data, having its own synthesis states, its own envelopes, its own filters and so on. Certain sounds / instruments require only one voice per note, more complex sounds / instruments though may consume 4 voices per note or even more. Since each voice consumes hardware resources, the amount of voices that may be played simultaniously by your iPad / iPhone is limited. The precise maximum amount of voices depends especially on your iOS device model being used. Find out more ...
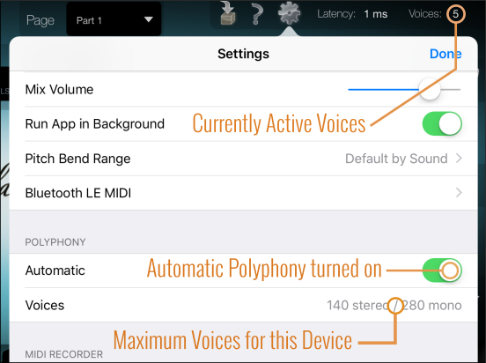 The amount of voices in use are displayed in real-time on the very top right of
your screen.
By default automatic polyphony is turned on. That means the app tries to
find an appropriate maximum amount of voices for you, depending on various
factors, for example the exact iPad / iPhone / iPod touch model being used,
the currently selected latency setting, but also
depending on whether you are using certain effects or are using Inter-App Audio
mode. Because there are a variety of factors that have an impact on overall
resource consumption of your device and thus the maximum amount of voices your
device may handle depends on numerous circumstances. Due to this it is
recommend to leave the app in automatic polyphony mode. As long as automatic
polyphony mode is on, the "Voices" row from the settings screen is read only,
that is it will only show you the currently selected maximum polyphony as being
decided by the app for the moment for you.
The amount of voices in use are displayed in real-time on the very top right of
your screen.
By default automatic polyphony is turned on. That means the app tries to
find an appropriate maximum amount of voices for you, depending on various
factors, for example the exact iPad / iPhone / iPod touch model being used,
the currently selected latency setting, but also
depending on whether you are using certain effects or are using Inter-App Audio
mode. Because there are a variety of factors that have an impact on overall
resource consumption of your device and thus the maximum amount of voices your
device may handle depends on numerous circumstances. Due to this it is
recommend to leave the app in automatic polyphony mode. As long as automatic
polyphony mode is on, the "Voices" row from the settings screen is read only,
that is it will only show you the currently selected maximum polyphony as being
decided by the app for the moment for you.
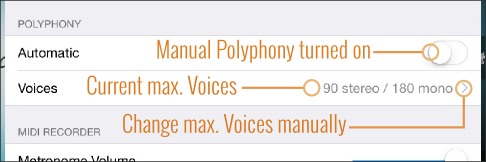 If you rather want to have more control over the app's maximum polyphony, then
you may switch off automatic polyphony. In this case it is up to you to
select an appropriate value for the maximum amount of voices. You may want to
do so for example when you are using several other audio apps at the same time,
and want to reserve a certain amount of resources for those other apps, so in
this case you might want to reduce the maximum amount of voices so that
iSymphonic Orchestra reduces hardware resource consumption (i.e. CPU usage and
SSD bandwidth). Another reason might be that you want to fine tune this setting
for a recent iOS device model, especially since automatic polyphony
usually selects the respective amount of max. voices under pessimistic aspects.
In such cases you might increase max. voices manually to achieve a higher overall
polyphony. When setting the maximum voices manually, please review the following
guideline:
If you rather want to have more control over the app's maximum polyphony, then
you may switch off automatic polyphony. In this case it is up to you to
select an appropriate value for the maximum amount of voices. You may want to
do so for example when you are using several other audio apps at the same time,
and want to reserve a certain amount of resources for those other apps, so in
this case you might want to reduce the maximum amount of voices so that
iSymphonic Orchestra reduces hardware resource consumption (i.e. CPU usage and
SSD bandwidth). Another reason might be that you want to fine tune this setting
for a recent iOS device model, especially since automatic polyphony
usually selects the respective amount of max. voices under pessimistic aspects.
In such cases you might increase max. voices manually to achieve a higher overall
polyphony. When setting the maximum voices manually, please review the following
guideline:
- If you encounter noise, artificial artifacts or stuttering audio while playing with the app, then the maximum amount of voices is too high. Reduce max. voices until those undesired audio artifacts disappear while playing.
- If you hear that notes got cut off unexpectedly or if overall sound seems to be too "thin", then you might want to increase the max. voices setting.
- Keep in mind that whenever you change your audio setup (i.e. when you decrease the latency setting, turn on effects or start using other apps simultaniously) this might require you to adjust your manually selected maximum polyphony setting each time.
- On doubt, re-enable automatic polyphony again.
- If you still encounter undesired audio artifacts even when automatic polyphony is turned on, then please check whether other audio apps are running in the background. And if so, stop those other audio apps from running in the background.
Latency
There is always a certain amount of delay involved when playing with an
electronical instrument.
The time that passes between triggering a note on your keyboard and the time
when you actually hear its result on your audio speakers is called latency.
In a digital system - like with this app - the amount of latency is mostly
defined but the digital audio buffer size the system (or app) is working with.
This is configurable, and hence its latency is configurable. If the overall
latency is too high
(that is if the delay is too long), then it will obviously have a negative
impact on your playing. On the other hand, when using a very small latency
setting, this comes with a price: The digital system has to work with tiny
buffer sizes and CPU usage increases substantially; not anti-proportional to the
buffer size, but in fact with complex digital systems (like this app) even
exponentially. As a result, the maximum polyphony that may be delivered with
your device shrinks substantially with smaller buffer sizes.
Most musicians are fine with a latency of 23ms, and that's why
this is the default latency setting with all our apps.
There are however also some musicians who are very sensitive to even lowest
latencies of less than 5ms. So as a musician you have to
make a trade-off and decide by yourself what an appropriate latency is for your
playing style. How much latency can you bear, how much polyphony do you need,
and how much resources do you probably need for other apps running on your device
at the same time.
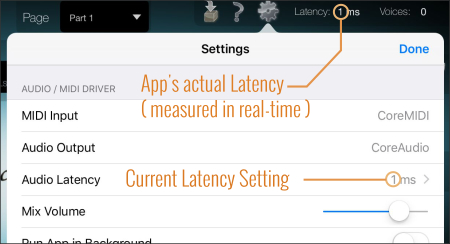 You may configure the amount of latency on the settings screen of iSymphonic
Orchestra, as shown on this screen shot. On the very top of the screen you can
always read the current latency of the app. This value does not simply display
the latency setting you selected, instead it always displays the real, effective
latency as measured by the app in real-time. So it adds additional control
whether the latency is actually the one desired by you, and whether that
latency is stable (that is retaining at a constant latency value).
You may configure the amount of latency on the settings screen of iSymphonic
Orchestra, as shown on this screen shot. On the very top of the screen you can
always read the current latency of the app. This value does not simply display
the latency setting you selected, instead it always displays the real, effective
latency as measured by the app in real-time. So it adds additional control
whether the latency is actually the one desired by you, and whether that
latency is stable (that is retaining at a constant latency value).
In both cases, check whether other apps are
running in the background and stop
them from running in the background.
Run App in Background
By default this app will automatically be suspended (stopped) whenever you press the home button at your iPad / iPhone, or when you switch to another app. Sometimes you may want the app though to continue running in the background, for example when you are using another app to display scores while you are playing orchestra sounds on your keyboard with iSymphonic Orchestra. To do so, go to the settings screen of this app, which you can reach by tapping on the small gear wheel icon top right on the main screen of this app. At section "Audio / MIDI Driver" you find a switch called "Run App in Background". Enable this switch to keep the iSymphonic Orchestra app running in the background, even when it is not visible on the screen.
See also: Background Apps.
App States
 An App State is a snapshot of the entire app at a certain
point of time which you may save as a user preset and entirely restore at a later point.
This feature allows you to save all sound settings of
all 16 parts, as well
as everything you had on the MIDI recorder screen. So with the latter you may also quickly
restore backing MIDI tracks which assist you during your next live song on stage.
An App State is a snapshot of the entire app at a certain
point of time which you may save as a user preset and entirely restore at a later point.
This feature allows you to save all sound settings of
all 16 parts, as well
as everything you had on the MIDI recorder screen. So with the latter you may also quickly
restore backing MIDI tracks which assist you during your next live song on stage.
Similar features of other vendors are typically called "Set Lists" or "Performance Presets".
However sometimes it makes sense to do things differently, and we did, so we also gave this
feature another name.
Open the App State screen by tapping on its icon on top left of the app's main screen.
Labels
The actual list of App States is comprised of virtual, graphical paper strips, or "labels".
 Obviously you need some way to distinguish your individual App States, such that you can always
remember easily which App State was saved by you for which purpose. Instead of trying
to push that important information into a regular title text which you would need to
enter with a text keyboard, we came up with the idea to handle this like musicians were used
to before, back in the analogue days with real "set lists" for live shows: by using a
pen. So we explicitly support Apple Pencil for allowing you to hand write and draw
everything you need, and in a way you personally find appropriate to distinguish your App States
in any stressful situation on stage.
Obviously you need some way to distinguish your individual App States, such that you can always
remember easily which App State was saved by you for which purpose. Instead of trying
to push that important information into a regular title text which you would need to
enter with a text keyboard, we came up with the idea to handle this like musicians were used
to before, back in the analogue days with real "set lists" for live shows: by using a
pen. So we explicitly support Apple Pencil for allowing you to hand write and draw
everything you need, and in a way you personally find appropriate to distinguish your App States
in any stressful situation on stage.
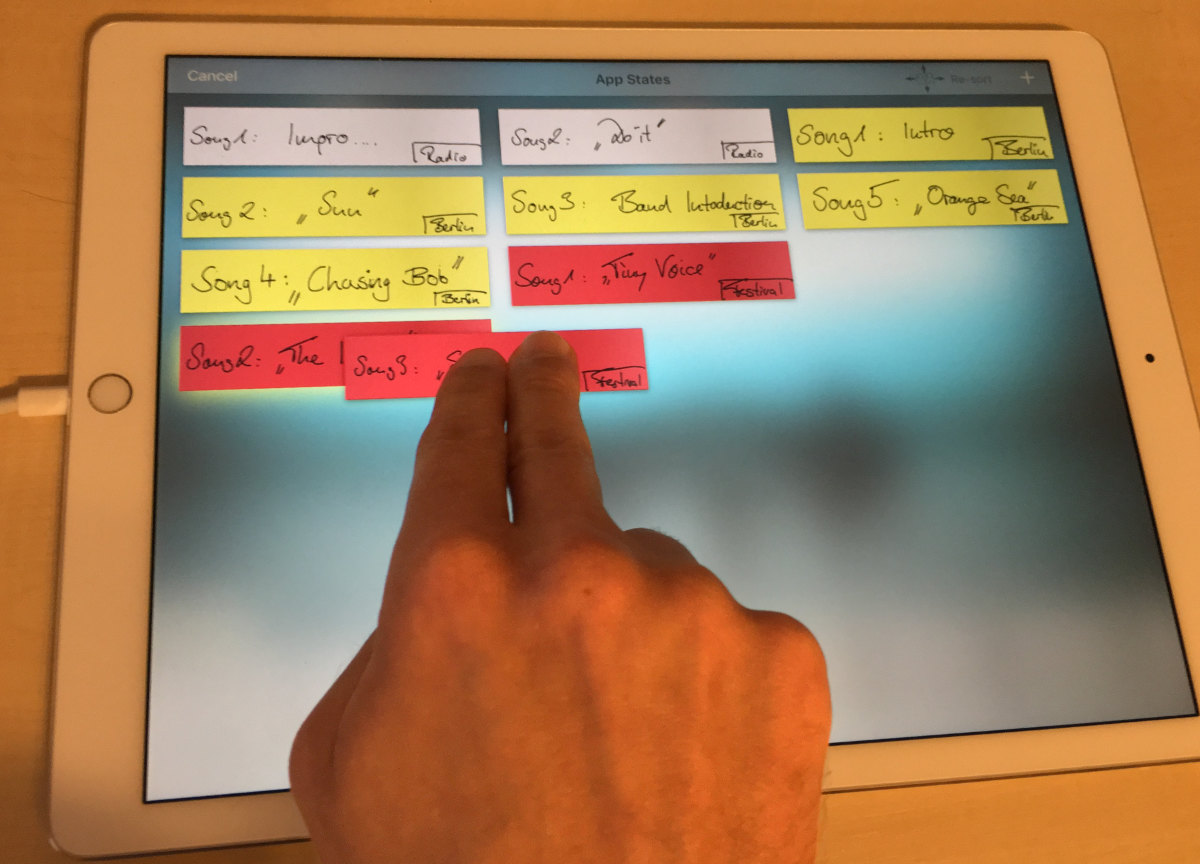
As you can see on the left, every App State you save is represented in the app by a rectangular paper strip
which you can write and paint on appropriately. You can also assign a background color
and material for each strip, so you might visually group your App States by color to visually separate them
for different live shows where you perform different songs for example.
You can also arrange your individual App States in the list. Simply drag an App State strip with two fingers from its old position to its new desired location in the list. That way you can easily sort the configurations for your next shows.
And of course, when your App State list grows, use the usual single finger swipe gesture to scroll the list.
To create a new App State simply tap on the "+" button which you can find top right on the
App State screen.
Restore
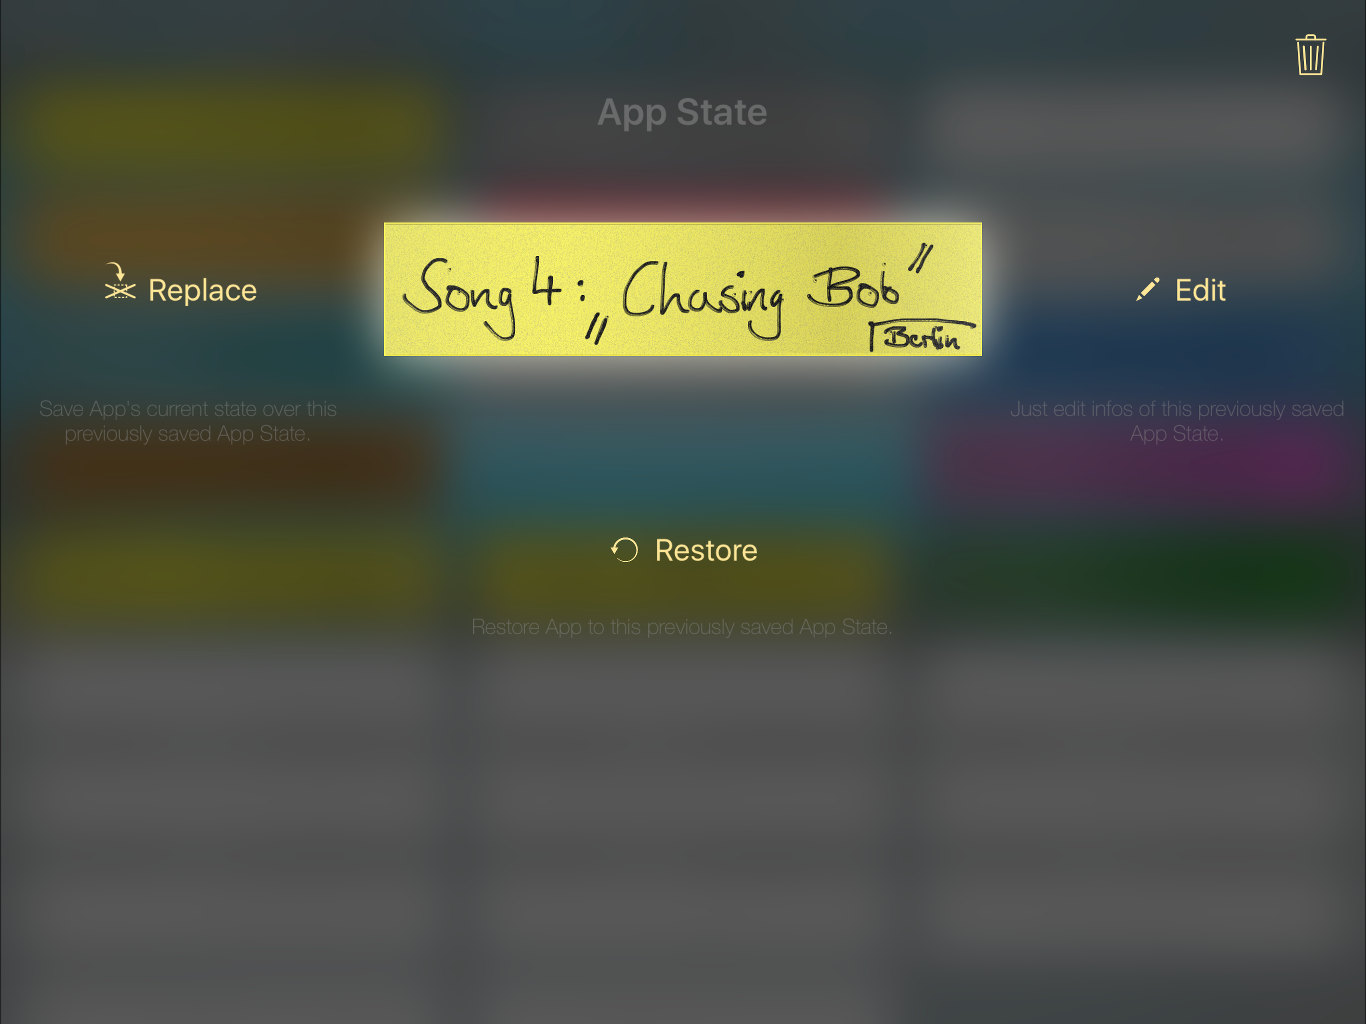 To restore, edit, replace or delete an App State, simply single tap on the respective App State label
from the list of App States. The App State label enlarges and provides you the available options.
To restore, edit, replace or delete an App State, simply single tap on the respective App State label
from the list of App States. The App State label enlarges and provides you the available options.
The most important option here is the "Restore" option of course, which you will use during live shows
to restore the entire app to this previously saved App State.
To fine tune an existing App State, simply restore the respective App State, then go back to the app's
main screen and alter the app's configuration as desired. Then come back to the App State screen,
single tap on the respective label and tap on "Replace". This will overwrite the selected App State
with the most recent overall configuration of the app.
Remote Control
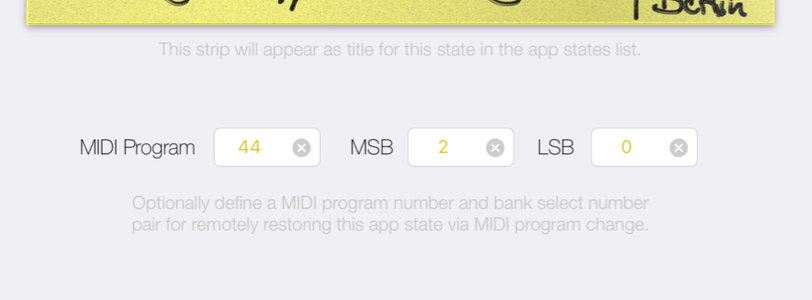 You don't want to use the touch screen during live performances at all? Then assign MIDI program change
and bank select numbers to your App States to restore App States remotely with a tap of a button directly
at your external MIDI keyboard.
You don't want to use the touch screen during live performances at all? Then assign MIDI program change
and bank select numbers to your App States to restore App States remotely with a tap of a button directly
at your external MIDI keyboard.
Panic Button
 Due to the nature of the MIDI protocol it is possible that you may encounter so called "hanging" notes under
certain setup related situations, for example if your external keyboard is detached from your iPad / iPhone while
you were still holding a chord. A "hanging" note is a note that you
hear playing even though you don't expect it to still being playing
(i.e. because you released all keys on your external MIDI keyboard already).
This is not a defect of the app, but rather an inevitable result on certain MIDI connection
related issues.
Usually pressing the respective key on your external MIDI keyboard or on the
virtual on-screen piano keyboard resolves this situation, the note will stop playing,
however especially during a live show you
rather want a more quick and reliable solution which this "panic" button serves for. By pressing the "panic"
button all currently active notes will immediately be killed.
Due to the nature of the MIDI protocol it is possible that you may encounter so called "hanging" notes under
certain setup related situations, for example if your external keyboard is detached from your iPad / iPhone while
you were still holding a chord. A "hanging" note is a note that you
hear playing even though you don't expect it to still being playing
(i.e. because you released all keys on your external MIDI keyboard already).
This is not a defect of the app, but rather an inevitable result on certain MIDI connection
related issues.
Usually pressing the respective key on your external MIDI keyboard or on the
virtual on-screen piano keyboard resolves this situation, the note will stop playing,
however especially during a live show you
rather want a more quick and reliable solution which this "panic" button serves for. By pressing the "panic"
button all currently active notes will immediately be killed.
Built-in MIDI Recorder
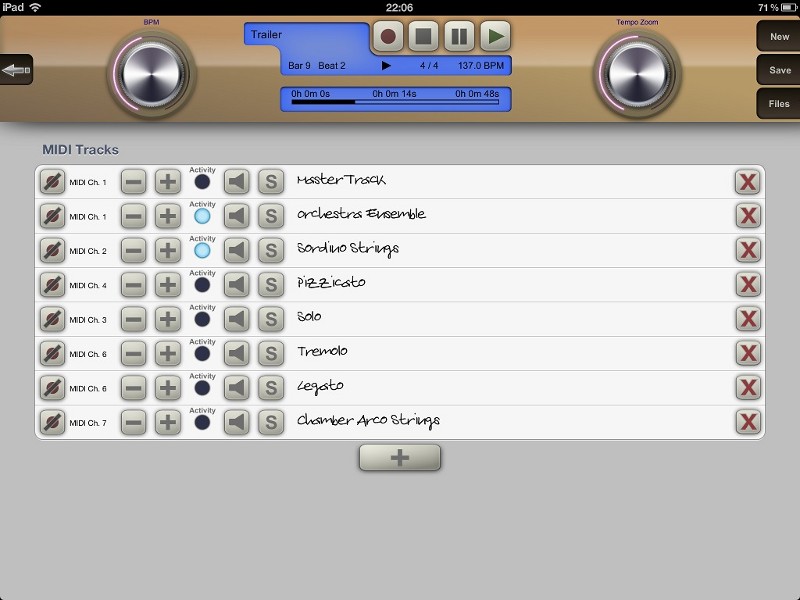 Refer to the MIDI Recorder manual
for information about the built-in MIDI Recorder of iSymphonic Orchestra.
Refer to the MIDI Recorder manual
for information about the built-in MIDI Recorder of iSymphonic Orchestra.
That manual also covers all Recorder specific settings that you can find on
the settings screen of this app.